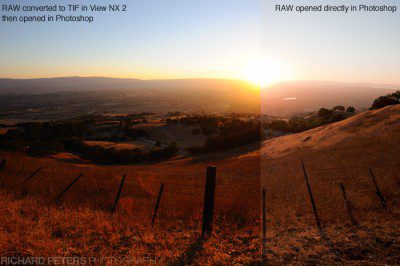
Many of you will know this, but for those that don’t, all RAW converters are not the same. Check out the images below. I’ve cut them in two, and although they are the same photos, one side shows different colour rendition and contrast to the other. However, all I’ve done is open the same RAW file twice, once in Nikon View NX2 software and once directly in Photoshop! Colour management is a huge can of worms, but I wanted to post this to show how even if you have a calibrated monitor and fine tuned camera settings, the software you use could still result in you not getting the best starting position when you begin the edit back home.
What is NX2, what are RAW convertors?
Ok, first up, a quick word for those that are new to RAW and aren’t sure what they, or their converters are:
A RAW file contains all the original sensor data/camera settings captured in the image and keeps them to one side. So when you open the image in the right piece of software, you still have all the settings available to further adjust, such as white balance, exposure compensation, sharpening etc.
A jpeg on the other hand, applies all those settings to the image in camera, as soon as the photo is taken. It then compresses the data (or in other words, throws it away) and gives you a jpeg file. The trouble is, in doing that, it is throwing away valuable information from the image that you can never get back, which means you’re never getting the very best from your photos. It also explains why jpegs are much smaller file sizes than the same image taken in RAW.
Taking it to it’s simplest form, think of it like this…a RAW file is like a letter you’ve typed on the computer and have sitting on the screen in front of you, and a jpeg is like a printed version of that same letter. It still has the same content as the one on the screen, but if you need to change that content on the printed version, such as a spelling mistake, you can’t. The printed version (or, the jpeg) is final. What you need is the original document (or, the RAW file) to make any changes.
So, basically, using the example above, Nikon’s NX software (along with Photoshop etc) is like a word processor, it’s letting you edit the original document rather than giving you a printed copy of it. This means, if you need to change, for example, the white balance of your image or the exposure compensation, you can just open the RAW file in NX and adjust a couple of sliders to get the desired effect. And the best part is, it’s never making these adjustments permanent, so you can always revert back to old settings if you want to without degrading the image.
Some background
Ok, so hopefully those of you who were not sure about RAW files etc are now up to speed but before I show the examples, here is a quick bit of background to help illustrate my own situation and work flow. I’ve got no experience of Canon’s own editing software so can’t really compare, but as you can see below, if you shoot Nikon the result can vary greatly when starting to edit your images.
The trouble is this, I take a photo with my camera, look at the review image on the LCD screen and like what I see. I then get home and review those images on the computer using Nikon’s View NX2 software (I’ve used the various versions of View since my D100 days), and I get images that have a pretty accurate colour and contrast to what I saw on the back of the camera – but of course lets not forget, the camera LCD will never give the ultimate in colour reproduction. Despite that, I’ve always known where I stand using Nikon’s View software, colours are saturated and contrast is good.
Things start to go wrong when trying to open an image in Photoshop to edit it. I’ve always liked Photoshop and I’m not trying to start a PS v LR v A debate, even now Lightroom and Aperture are firmly established it’s Photoshop that I want to use. It’s got more advanced features, I don’t need to import a library and I use it for design elements for my website and blog, which all ties in with my photography. I like Photoshop! But this is where my frustration comes in, even though I rarely hear anyone else complain about the issue (my suspected reason for that, is further down).
The problem
Depending on the image, Photoshops Adobe Camera Raw (ACR) plug-in isn’t as accurate at representing the colours from Nikon’s RAW (NEF) files as Nikon’s own software, because by default it ignores the camera settings present in the RAW file, and does it’s own conversion (thanks Andy, for simplifying the point) . As such, I have to open my images in View NX2 and convert them to TIFFs, then open the TIFF in Photoshop. Not ideal as it slows me down, but the only work around I have.
Examples
The difference between the way ACR reads NEF files by default can appear to vary massively depending on the colour palette and lighting in the image. Here are three examples showing it can go from almost unnoticeable to glaringly obvious. All these images are unedited, apart from being re-sized down to web friendly and were shot and composited together in the Adobe RGB colour space, before being flattened and converted to sRGB before saving for web.
(Top tip, for those don’t know, saving an image for web in the Adobe RGB colour space will mute colours, so always convert to sRGB before saving for web presentation)
Image one:

Subtle, almost indistinguishable difference
If it wasn’t for the line down the centre of the image you’d be hard pressed to notice the difference at first glance between these two images. But the fact you can see the line says it all. Now also look at the colour in the leaves in the tree at the top of frame, you’ll see improved colours on the left. The grass also, is more vibrant on the image to the left but it is harder to spot, even side by side.
Image two:

Conversion differences worsen
In this image the contrast between the two is clearly defined by that line down the centre of the image. The image on the left has slightly more golden hues whereas the right side is slightly more muted and brown.
Image three:

Severe differences
This is the type of colour palette and lighting that really shows the problem up, the golden hues and contrast in the foreground are reduced and the subtle hints of yellow and blue in the sky are lost. As is the intense yellow light around where the sun meets the distant hills.
You see the problem?
Here you can, yes, but depending on what your software and work flow is at home, maybe not. Remember earlier I said I had a suspected reason for more people not noticing this? Well here it is. For example. If you view and edit your images with Lightoom you would never notice this difference in how the RAW file is interpreted because you’re only ever seeing it through the ACR plug-in that Photoshop also uses. But as you can see above, that plug-in, when it comes to Nikon RAW files at least, has a nasty habit of reducing the colour and saturation in images and generally making them appear slightly flatter.
I always edit my images anyway, so does it matter?
Yes, but by how much depends on you. I wanted to show you a range of images to give you an idea that although it’s harder to spot on some photos, there is always a difference between Nikon and Adobes RAW conversion. If it was just a simple saturation or contrast boost I wouldn’t be too bothered but as you can see from the bottom image it can sometimes require a lot more work than that. Lets not forget, you DO still have full control of the RAW settings to re-adjust everything in ACR, that’s true enough. However, even after playing with the many ACR settings extensively (including the Camera Calibration) I’ve never managed to get a result I’m happy enough with that’s close to the ‘out the box’ image from Nikon’s NX software – a shame, but I suppose not really a surprise?! (it was put to me recently, as Nikon make and sell their own editing software, why would they want to share their formula for perfect RAW conversion of their files with anyone else?)
What next?
Well, not much really, I just wanted to illustrate a point I’ve explained many times over to people in the past. Colour management is a minefield, make no mistakes. Even if you have a calibrated monitor and fine tune the camera settings to get accurate results, you can still set yourself back if you don’t use the right bit of software to read that data. The ACR plug-in just doesn’t seem to replicate the colours and contrast of Nikon’s software as nicely, even with a lot of tweaking. So, if you’re a Nikon shooter at least, do some tests for yourself, download View NX2, open a RAW file and save to TIFF. Open that in your favourite editing software, then open the RAW file again directly in to that same software and compare the image to the TIFF. Maybe, just maybe, you’ll see you could potentially be getting more from your images or, at the very least, have a better starting point with which to begin editing.
If on the other hand you have devised the perfect formula for ACR settings to accurately match the Nikon NX2 software for NEF display, please share and enlighten this slightly grumpy, colour managed to death photographer!


