When I was taking the shot below I only had my Nikon 200-400 VR with me, which even at 200mm was so long I could only get a section of the scene in frame. So, to solve the problem, I took twelve shots and stitched them together! Lets find out how I turned the mess below into something worth keeping.
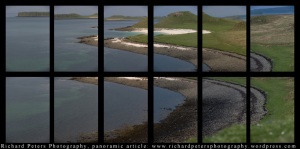
12 RAW shots ready to be stitched
Step one: Manual settings for all shots & overlaping each frame
The first step to creating a panoramic image is making sure the camera is set to manual so ALL the photos have the same exposure, aperture, shutter speed, white balance and focus. I have the camera in aperture priority so I can control the depth of field, I then look through the viewfinder at my first shot, use auto focus to get it where I want it (then switch it straight to manual and leave it) and check the shutter speed for my chosen aperture. I then switch to manual metering and dial in the settings the meter reading had given me. You may want to take a test shot and check your histogram to be %100 sure no exposure compensation is needed.
When you take your shots make sure you overlap each frame by around %20-30. The more overlap the more the software will have to work out the joins later, so you can do less or more but I find this amount works well. Also try to take the images in portrait orientation…its quicker to do landscape, yes…but you’ll get a higher resolution capturing the same photos needed in portrait.
You will notice the shots above have a colour miss-match. I did not have white balance set to manual as I put my hand up to being lazy and alter the white balance back on the computer. If you can use a tripod to make sure your images are %100 straight and lined up to each other then do, these were taken handheld so I had to take a mental note when doing the second row of roughly where each overlap should be.
Step two: preparing your images
I then opened my images all at once in CS3 to do the following:
-
Hit the select all button to highlight all images
-
Adjust the white balance & exposure if needed so all setting are applied to all images
-
Hit Save to save these images with the new settings.

CS3 RAW dialogue box
Image stitching software
I now open all the images in my favorite panoramic software, CS3 can do the job but I prefer to use Autopano Pro. This software operates as simply as checking a few boxes and hitting GO for the most part. It will do colour correction and arrange all the images for you at the click of a button…its so self explanatory I won’t go in to detail about operating the software for now, but if anyone has any further questions about this software then ask away.
Step three: editing in photoshop
Once you have run your images through your software you should have something along these lines. The funky square edges are normal as you’ll never get an image where all the shots line up exactly as that’s not how the software works, it will always juggle the image positions slightly to get a perfect alignment. Shots with coastal lines in the distance can be tricky as the contour of the land can mislead what you think is or isn’t straight.
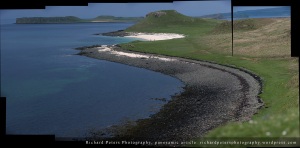
Stitched image ready for editing
I used this image as an example as it shows very nicely what can happen if your not paying attention! The horizon is not straight and, because I decided once I’d taken the shots I wanted to add more to the right, there is a gap between some shots where I got my overlap wrong. You don’t want this to happen as it adds to your editing time…that gap between the images is almost 200 pixels wide and 2500 long! Which brings me to a final point…
Word of warning about computer power
This image is made up of twelve, 12mp Nikon D3 images saved as jpegs (tiff would be larger file size but I did jpeg here for faster editing) so your going to need some pretty good processing power if you want to start combining lots of images together. Of course you can just stick with 3 or 4 images but depending on the scene and what part of it you want to capture more may be required. Here it was my only choice as I didn’t have even close to a wide angle lens with me. Just to give you an idea of the resolution, see the Image Size box below after I had flattened the image to remove my adjustment layers…this is pretty high resolution so if you like to print big, you can print really big!
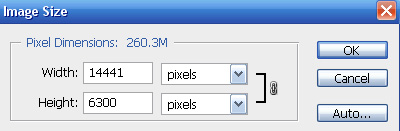
File sizes can get very big
So that’s it, edit to your normal tastes, crop out the excess area’s that are not required and your left with a beautiful image, and one which in this case, would not have been possible without using this technique. So thats it, 12 Nikon D3 images, taken at 200mm, f8 edited together to give a wide angle view of the lovely coral beach area of the Isle of Skye. To give the shot some scale, you can just make out two people walking over the hill in the middle of the shot towards the sand…
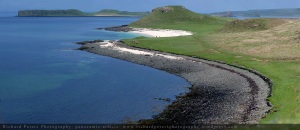
The end result