I am a firm believer that correctly tweaking camera settings, and understanding their functions, is crucial to improving your wildlife photography. This post goes beyond the basics of simply knowing how to switch between Aperture, Shutter Priority and Manual or using Back Button Focus. Whilst helpful, they’re just the start of getting the most from your camera and producing better photos.
The following camera features, tips and advice will help you customise your DSLR and enable you to react faster to changing conditions. They explore some of the lesser considered, but equally important ones for tailoring the setup of your camera. I also talk a little about why I use each one whenever and wherever I am taking my wildlife photos, to help give a little context to their use.
Whilst the tips featured are tailored around Nikon terminology and camera settings, the principles and advice are relevant to any brand of camera that share similar functions.
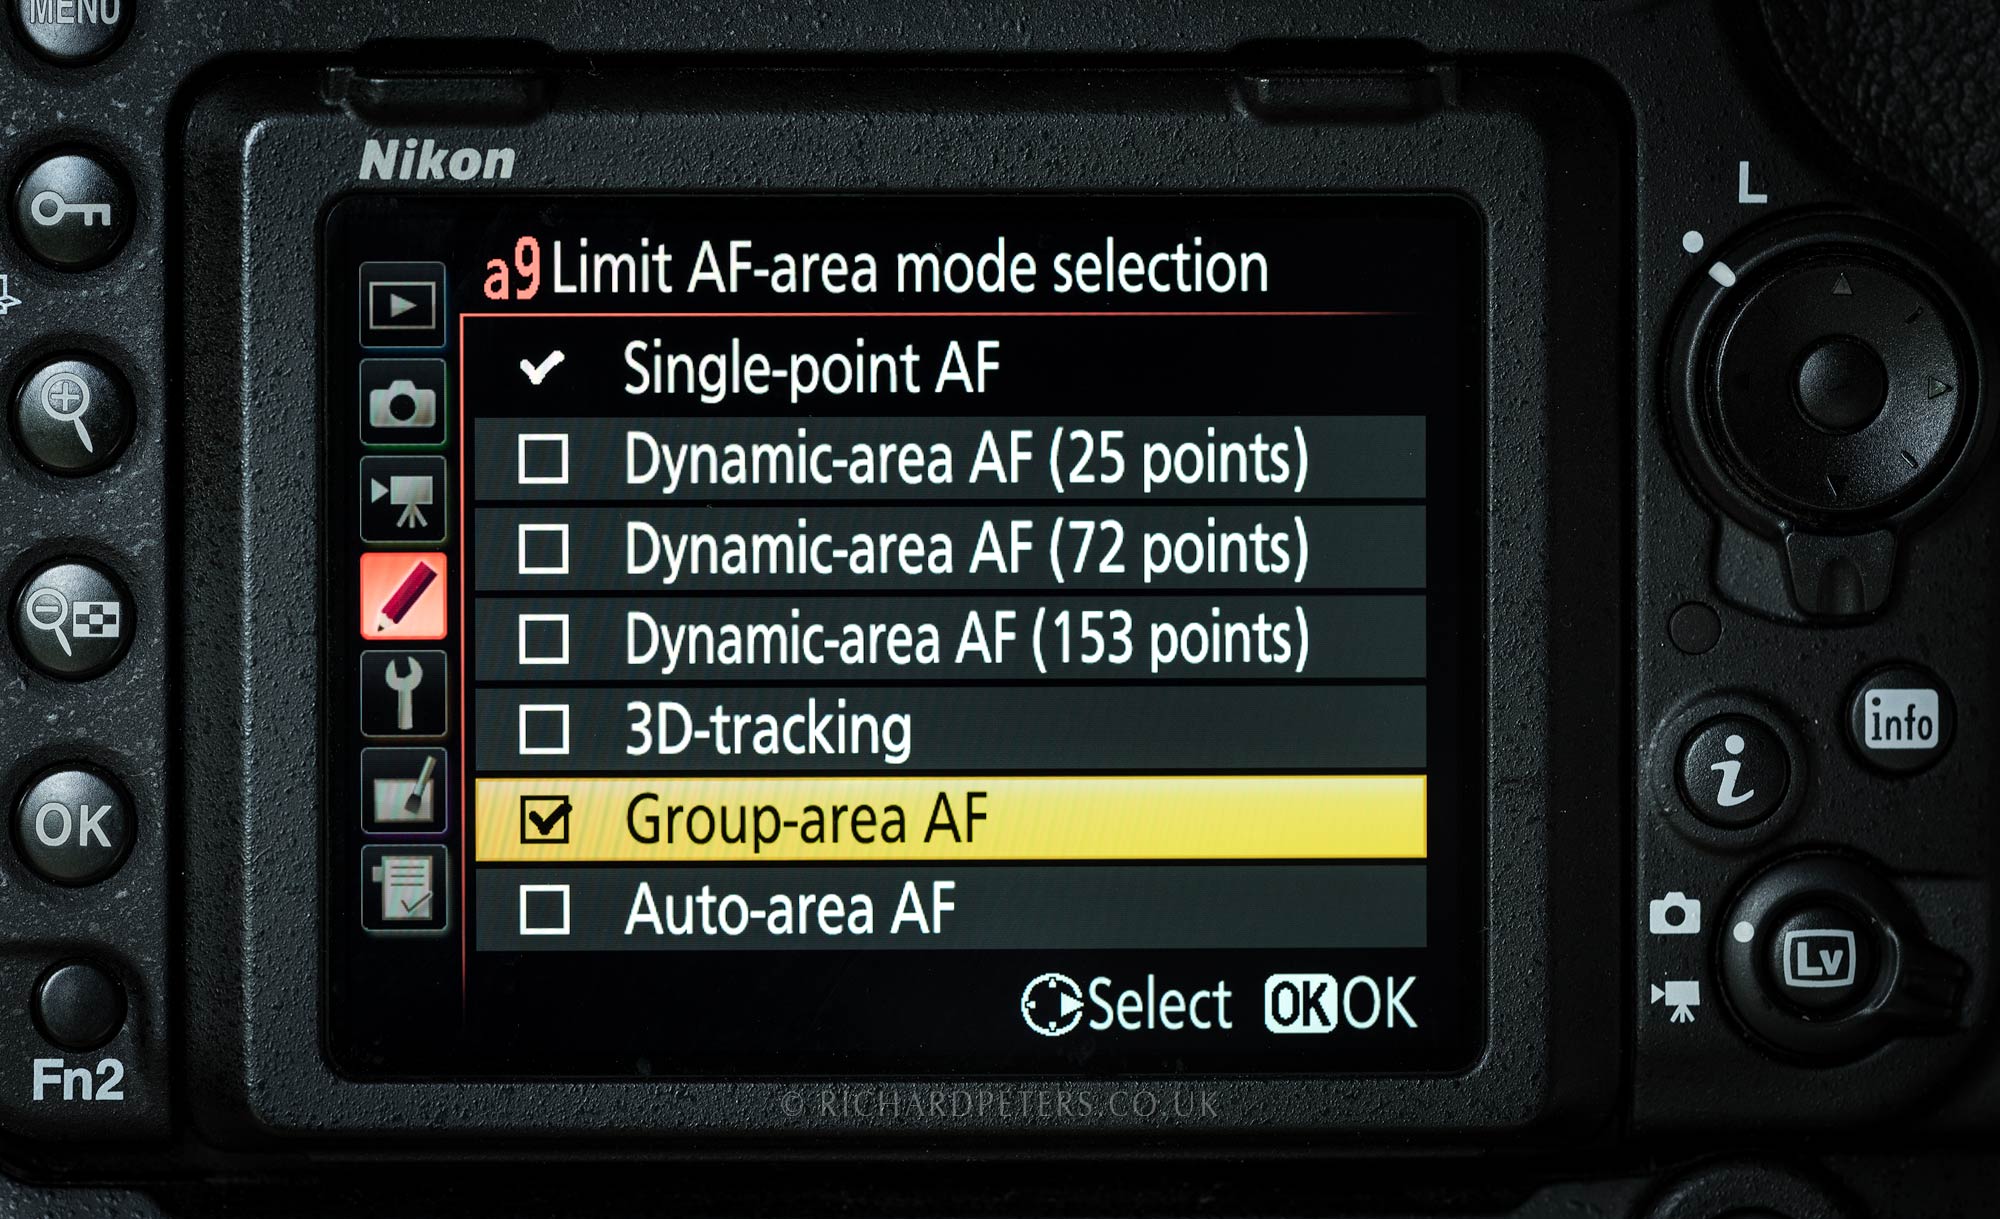
1) Hide autofocus modes you don’t use
This will be personal preference but if, for example, you find you only use single point and 51 point you can hide all the other modes. This means, when you hold down the focus mode button and scroll the command wheel to cycle through the various options, only the ones you need will appear. Because I tend to use Single and Group, I have hidden all higher point modes and 3D tracking. This means I am always one click of the scroll wheel from the autofocus mode I require. Should I ever have the need to get one of the others back, it’s quick and easy to do by following the next tip.
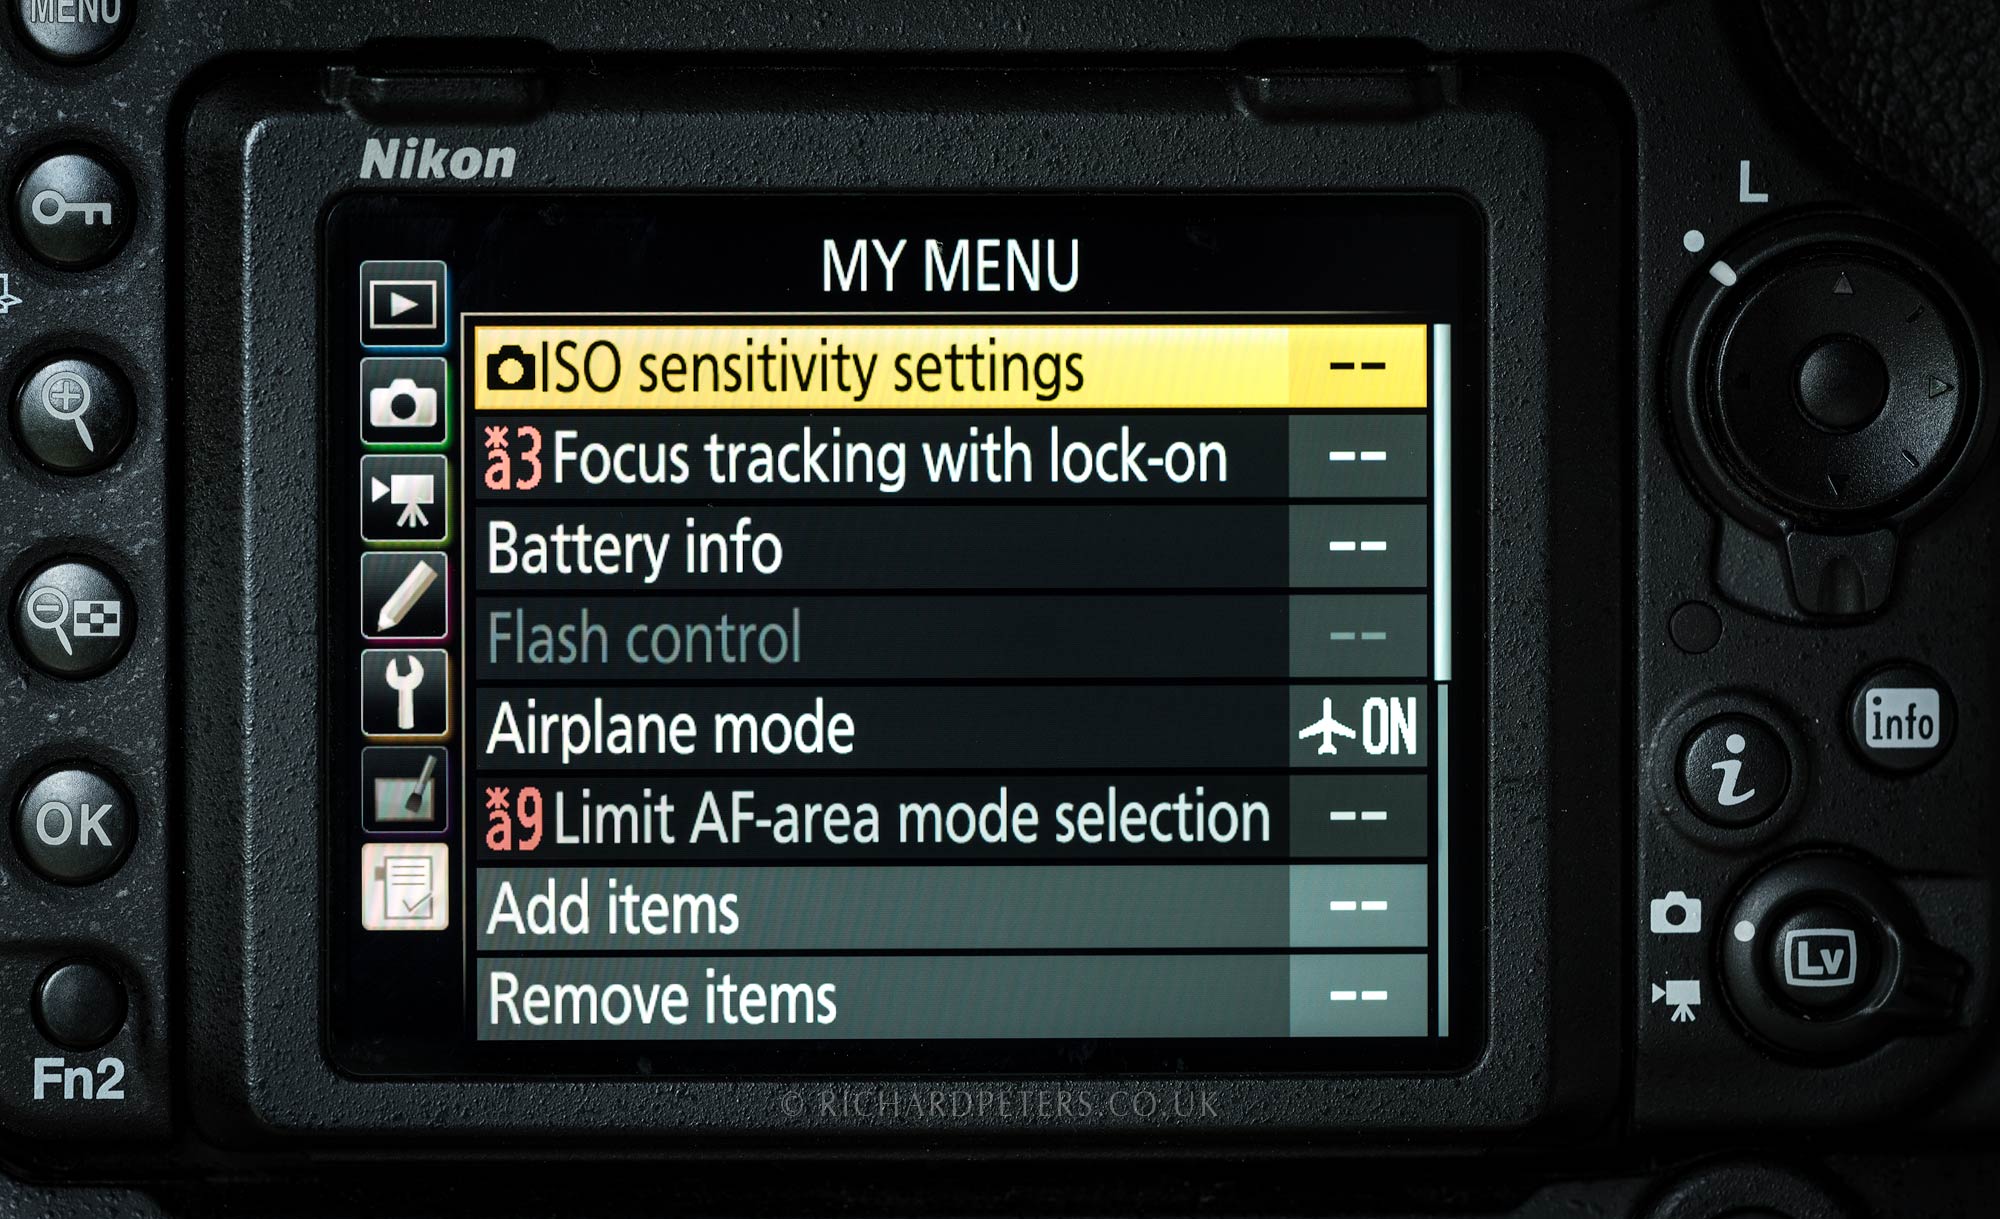
2) Put frequently used settings in My Menu
Another essential feature that can help you manage your camera more effectively. DSLR’s have a lot of menus and sub menus to navigate. Some are set and forget but others are needed more frequently. Finding specific camera settings can sometimes waste crucial seconds when you need to quickly react to a photographic opportunity. Wildlife is often predictable so the more prepared you are, the better. If your camera has My Menu or similar, make sure you put important settings in there.
To add items:
- Go to My Menu
- Add Items
- Find the settings you want and press OK.
[clickToTweet tweet=”By setting up your camera correctly, you’ll be prepared for any scenario” quote=”By setting up your camera correctly, you’ll be prepared for any scenario”]
I tend to put the following settings in mine:
ISO sensitivity settings: I use Auto ISO a lot, which can easily be turned on and off by holding the ISO button and rotating the front command wheel. However, I also keep ISO controls in My Menu. That way I ever find myself wanting to adjust the range Auto ISO uses or change the minimum shutter speed, should I switch to Aperture Priority, can do so quickly.
Focus Tracking with Lock-On: This determines how quickly the camera refocuses on competing objects with the frame that pass in front or behind the main subject. I like to have this setting available so I can adjust the focus sensitivity quickly, as the situation calls. This is especially useful for birds in flight.
Limit AF-area mode selection: Just in case I need to get back one of the autofocus modes I’ve hidden from tip 1!
Airplane Mode: I like to have this here so I can quickly turn bluetooth on and off, ensuring I’m not inadvertently helping the battery drain faster. Occasionally I use Nikon SnapBridge to get a Live View feed to my iPhone, so being able to turn connectivity on and off quickly is important.
Battery Status: Relying on the top LCD battery indicator isn’t really very reliable for anything other than a ballpark idea of how much power is left. Having a more accurate indication of battery levels is always useful.
3) Setup and use custom function buttons
There are a plethora of options available to you when tweaking your camera settings for wildlife photography. One of the most useful ways to tailor your camera is to make use of assigning helpful settings to various function buttons. Depending on your model the amount of customisation will vary but even older models will have some custom functionality available, even if not with dedicated buttons.
- Go to Custom Settings Menu
- Controls
- Custom control assignment
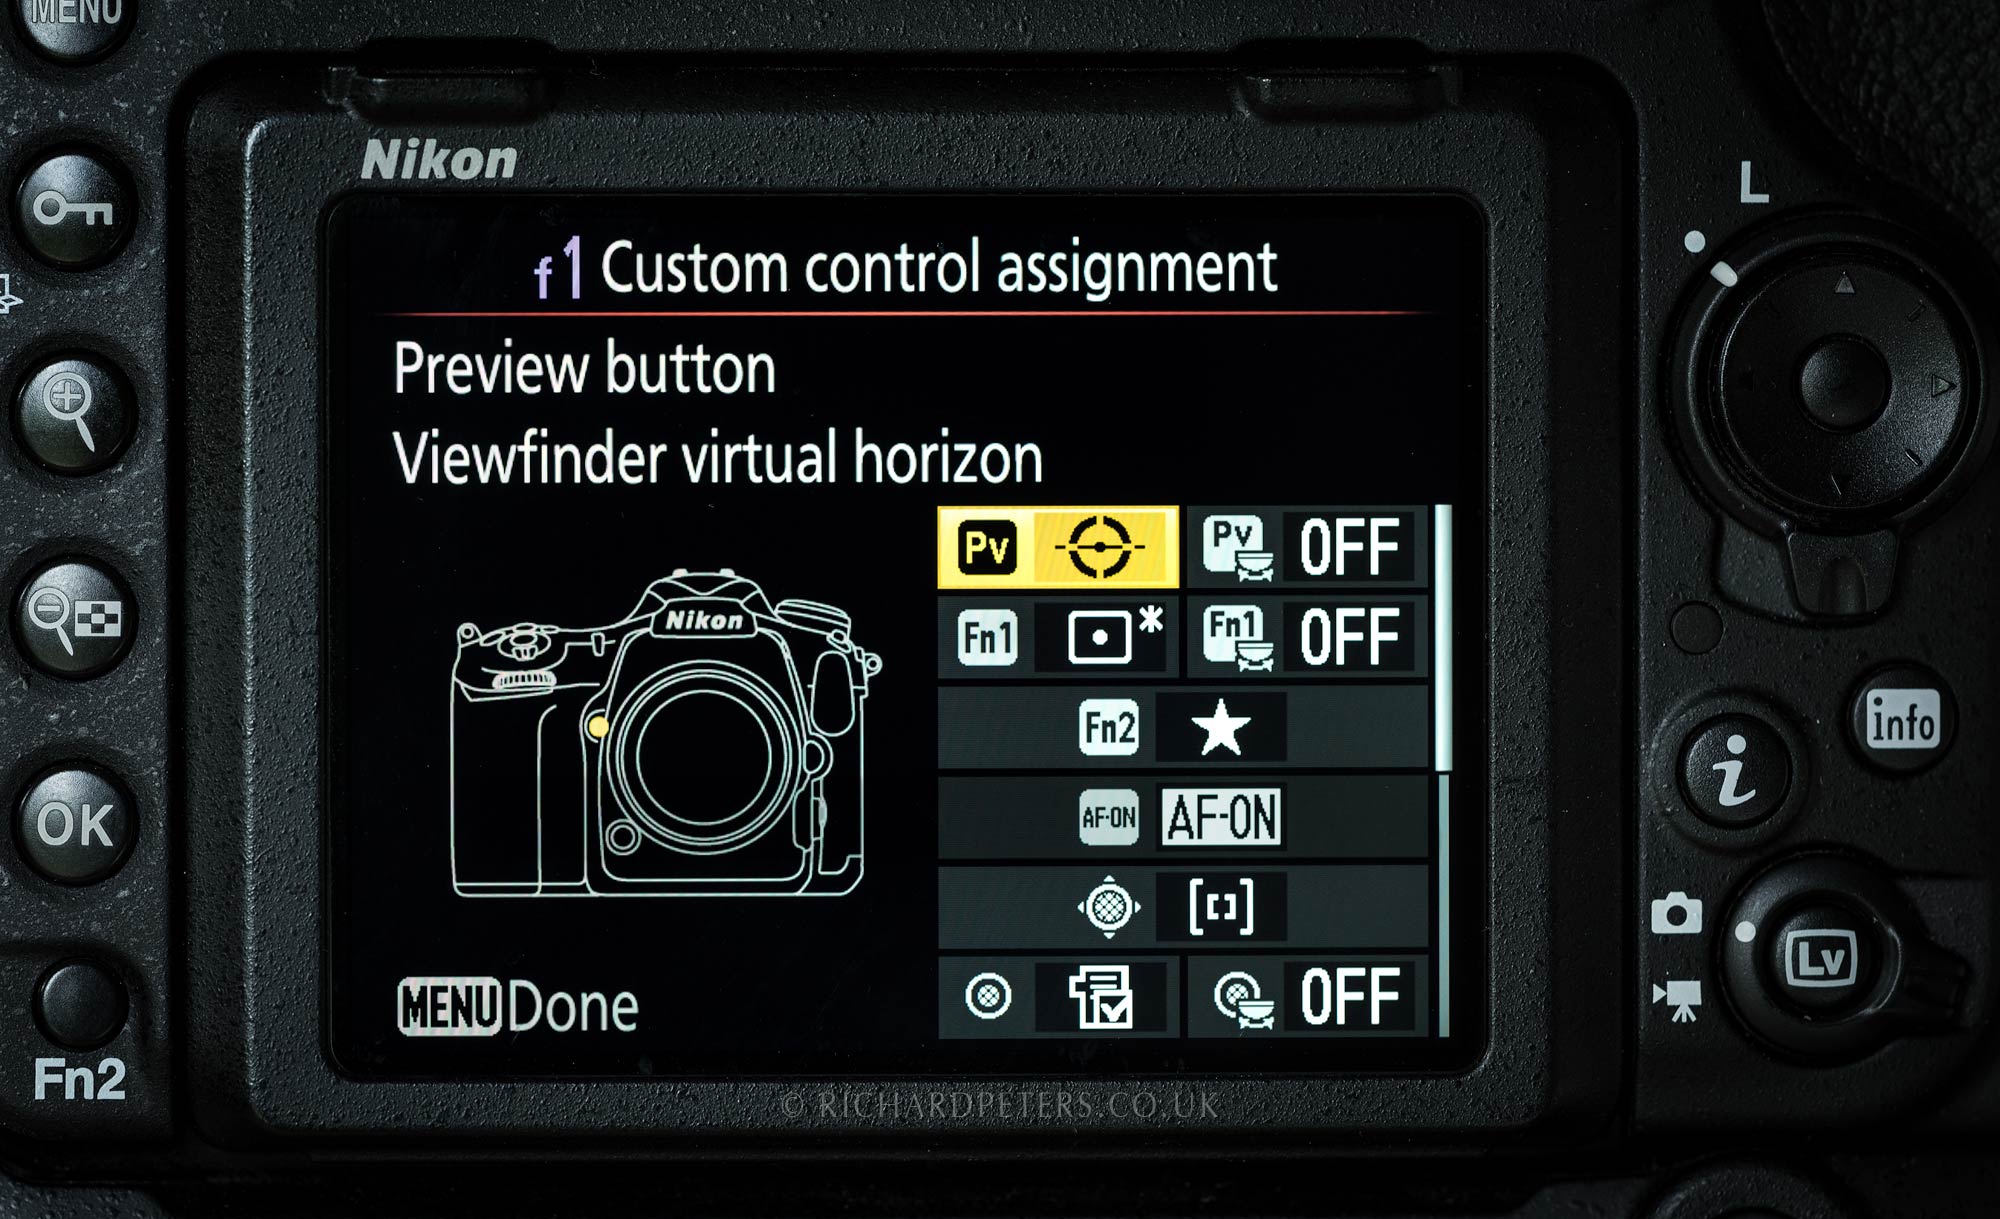
You may not have all of the following features available or enough buttons to assign to them but, to give you some inspiration, my preferred settings are as follows:
Virtual Horizon: Generally it’s always a good idea to have grids turned on in your viewfinder. However there can often be times, especially when using a shallow depth of field with a lot of out of focus elements, that there is nothing to line up those grids with. Or if you find yourself so low to the ground you can’t look through the viewfinder without tilting your head, getting the camera straight can be a challenge. By assigning virtual horizon to a custom button, you can instantly see if the camera is level, without taking your eye from the viewfinder. How this works will vary on model and manufacturer. On the Nikon D5 for example, it uses the focus points to replicate a spirit level. The D500 and D810 however, use the exposure meter at the bottom of the frame.
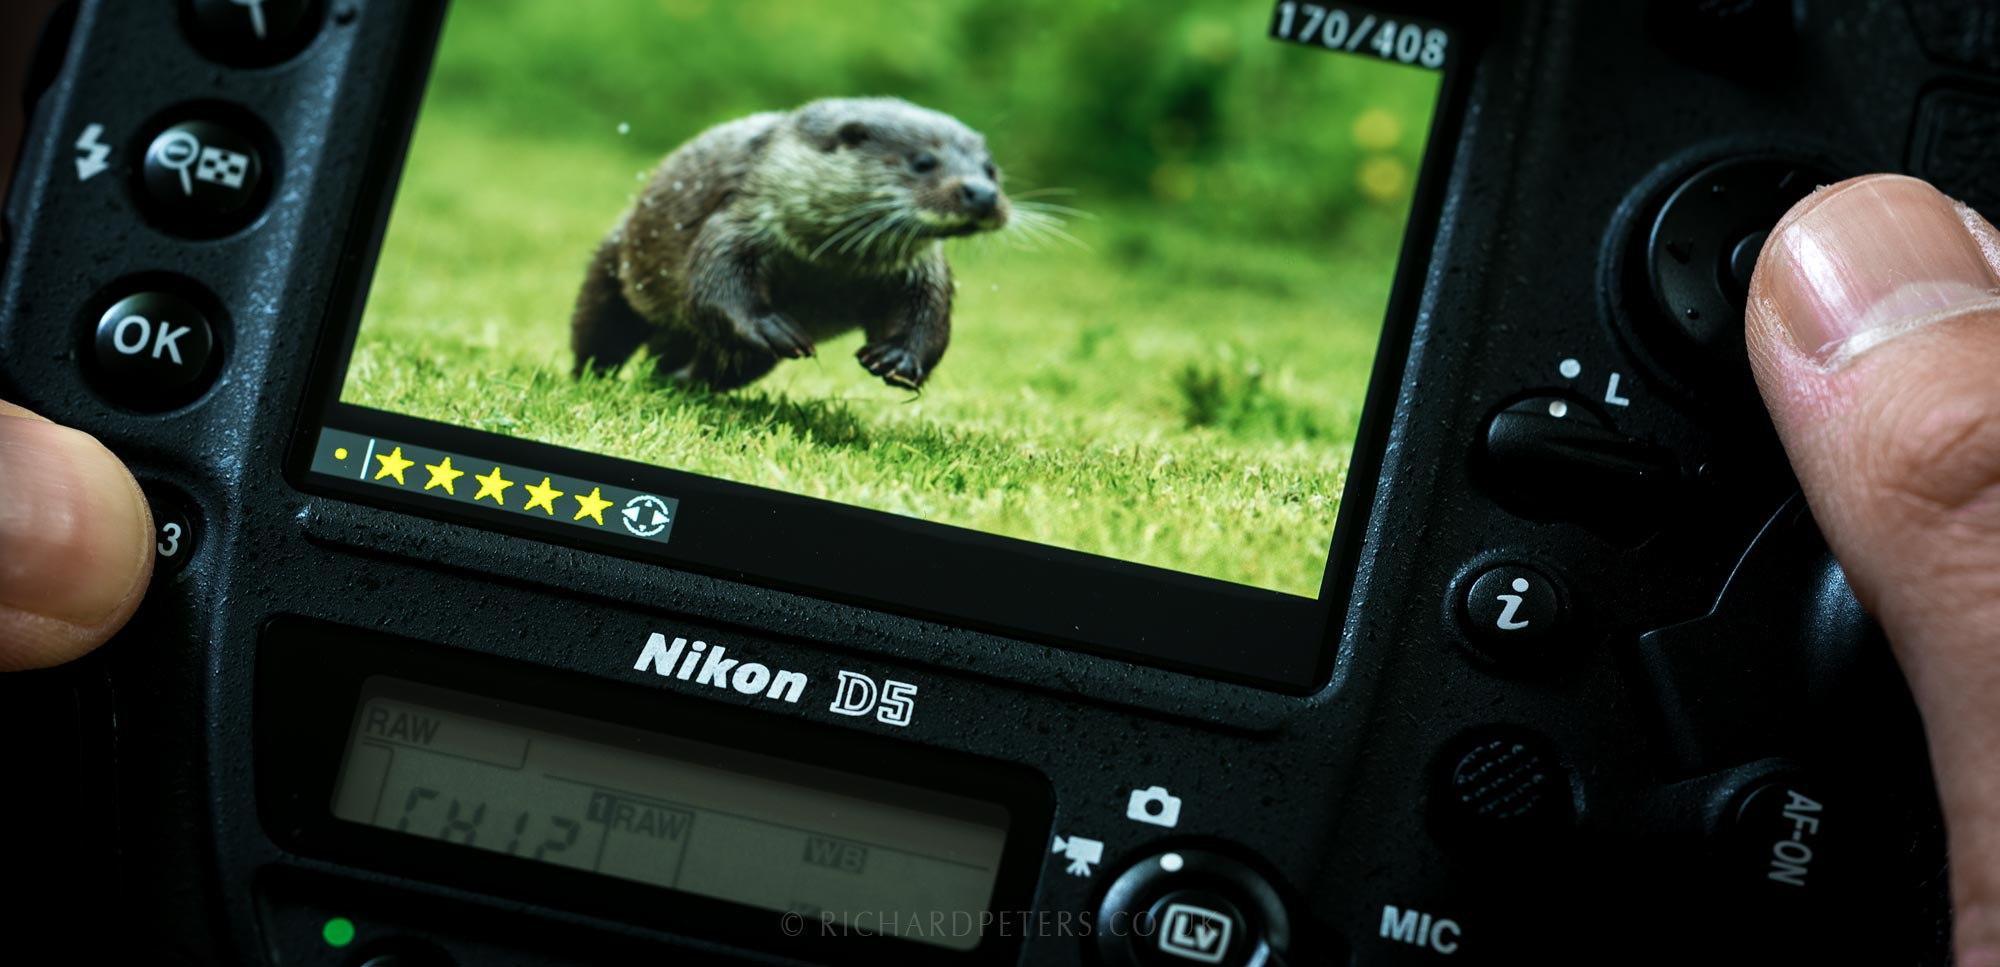
Star Rate Images: If your camera offers a rating system, assigning one of your function buttons to it is a must. With this set you’ll be able to quickly mark an image from 1 to 5 or mark for deletion in camera. This rating will then be kept when you import your images into Lightroom. If you’re shooting a lot of similar frames in a long sequence, or away travelling, being able to quickly tag the images you think are the ones to pay more attention to when you’re back at the computer, will help speed up your workflow no end. Whenever I switch between shooting with my D810’s and D500, I always miss this feature a lot with the former (edit: I have now replaced both of these cameras with the D850, which also had this feature).
Access My Menu: Because My Menu is a quick access shortcut to most used settings, it makes sense to have quick access to the menu itself!
Highlight-weighted Metering: Although I generally use Matrix Metering, it’s sometimes useful to have Highlight-weighted Metering quickly to hand. This metering mode acts as a combination of Matrix and Spot. Reading the entire scene but biassing exposure for the brightest areas. With this set I can hold down the function button to get metering based on Highlight-weighted and then, as soon as I release my finger, I’m straight back to Matrix. This can be useful if your subject moves into contrasting backlight, creating bright rim-lit highlights, or you’re shooting a bright subject with a dark background.
4) Set the multi-selector button to zoom on image playback
Often overlooked, setting this will allow you to quickly zoom in to your photos when reviewing images (better known as chimping) on the back of the camera. Not all DSLR screens are equal in resolution but setting this will allow you to quickly assess if focus and sharpness are in the right ballpark, without having to press the zoom buttons repeatedly. Depending on your model of camera, the level of magnification you can choose will vary.
- Press Menu
- Go to Custom Settings
- Controls (menu f)
- Multi selector center button
- Playback mode
- Zoom on/off
- Choose magnification level required and press OK
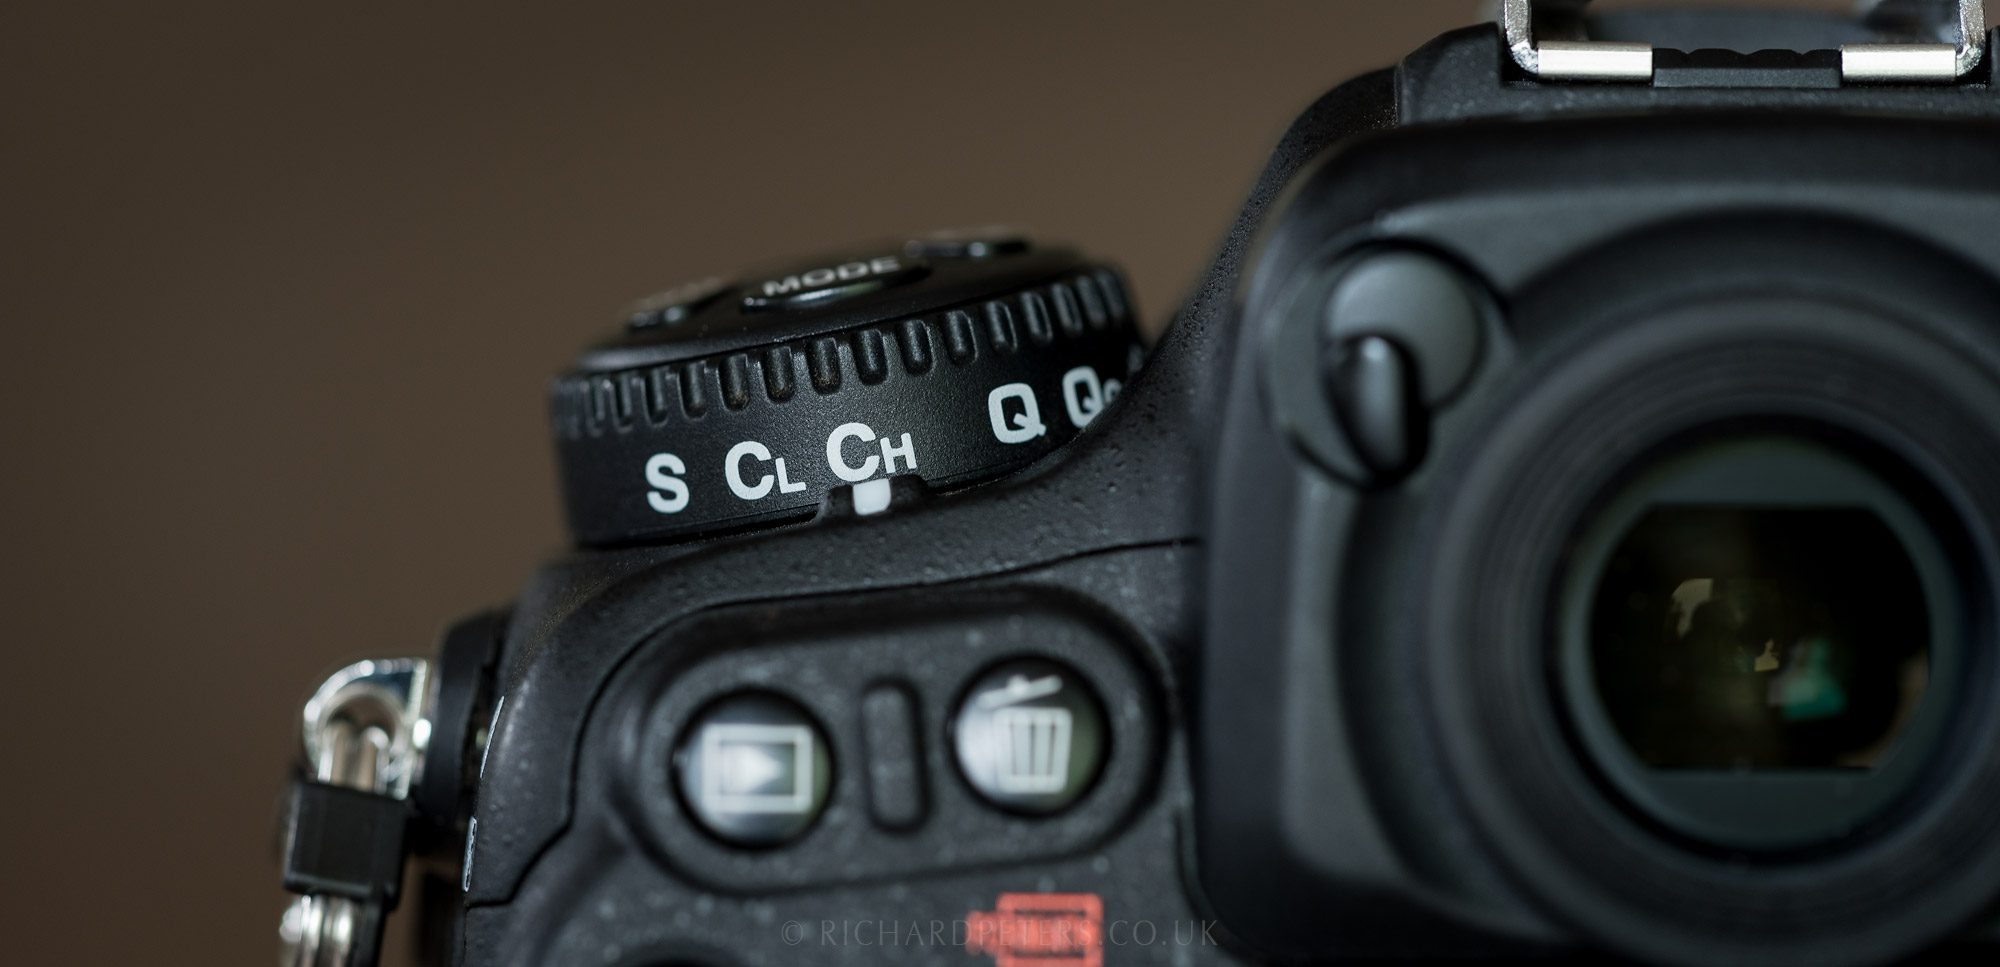
5) Keep it in continuous high
As this list of camera settings go, the last is the most obvious tip but one that is often overlooked by photographers just starting out. With wildlife photography, you never know what’s going to happen or when. Being prepared is half the battle to capturing good images. By having continuous high on, if the action should suddenly kick off, you’ll always have access to your cameras fastest frame rate. That doesn’t mean you need to always take a burst of shots though, as it’s still possible to take a single frame even in with the fastest cameras – although if you’ve got a D5 set to 12 frames per second, it may take a little practice to only fire one at a time. It’s worth it though. If something suddenly happens that requires a fast frame rate, by the time your brain has registered that and you’ve then switched the camera from single shot to burst mode, the action could be over. I speak from experience there…
[clickToTweet tweet=”Use these 5 essential settings to customise your camera and improve your wildlife photography” quote=”Use these 5 essential settings to customise your camera and improve your wildlife photography”]
Bonus tip: Set your copyright. Have your name and email address embedded in every photo you take. For more information on this, read my quick guide to adding your copyright to exif.
Want to learn more?
If you’d like to develop your own photographic abilities, the above are just some of the tips I use and teach on my wildlife photography workshops.